Sunday, March 8, 2015

Project Complete: Early 15th Century Townswoman Outfit


Project
A layered outfit in the style of early 15th century French townswomen.

Sources
Throughout the dozens of French manuscripts produced in the first few decades of the 15th century, a particularly typical clothing silhouette can be seen on what I would describe as urban townswomen. Broadly, these women were non-nobles, most often among the lower or working classes (though not exclusively or necessarily "peasants"). It appears in the available imagery, primarily looking at manuscripts, that these townswomen relied on a pretty straight-forward formula to create outfits that typified their class ideals of what was fashionable and appropriate. I have way too many favorites to show them all here, but here's a selection:

From The Comedies of Terence (BnF MS Latin 7907A), Publius Terencius, circa 1400-1407, fol. 81v.
Sostrata, a widow, with her servant, Canthara (in the purple "townswoman" outfit), and slave Geta.
Adelphoe (The Brothers).
From The Decameron (Arsenal MS 5070, reserve), Giovanni Boccaccio, 1432, fol. 337r.
A man and his wife offer room and board to 2 traveling men. Tale 6 from Day 9.
From De mulieribus claris (BnF MS French 598), Giovanni Boccaccio, circa 1403, fol. 100v.
Marcia, a roman sculptor and painter.
The outfit, on the basic level, is made up of two dress layers and an open hood. The lower layer could plausibly be a supportive dress with a front or side lacing. The top layer is a body-skimming fitted gown devoid of visible lacing or buttons.

Taking the whole selection of images I have of this type of outfit together, I believe that both dresses are long-sleeved. When the top layer's sleeve is worn down, I can find very little evidence that supports buttons in use in the manuscript depictions. In many images, however, the top layer's sleeves are rolled or pushed up, and in some cases, either buttons or the indication that the sleeve was opened at the wrist are present. 

From Saint John Altarpiece, by Rogier van der Weyden, circa 1455.
Wearing the sleeves in this "pushed up" manner is seen later in the century on a servant woman in the Saint John Altarpiece, by Rogier van der Weyden. In that case, though a bit later than the years I'm looking at, the outer dress sleeves appear to be looser, allowing them to simply be push up. The lower sleeve is clearly buttoned. Since this type of buttoned sleeve was developed in the 14th century, and still appears to have been in use by at least some women by the middle of the century, I think it's likely that one or both of the dress sleeves in the 1420's townswoman's outfit would or at least could have been buttoned.

Both dresses conform to the fitted ideals established at the end of the 14th century. This type of fitted gown had already been abandoned by noble women around the start of the 1420's, but certainly enjoyed a second life as the favored style among the lower ranks of society. Sleeve style is really the only true difference between what peasant/working women were wearing as compared to the bourgeois/middle class were wearing. For wealthier women, a flap-style, tippet-like sleeve was considered more stylish.

While I'd like to be able to state that the two styles of dress (long-sleeve and flap-sleeve) could have been interchangeable (meaning that they are simply two different takes on the same dress), there isn't much evidence for that. The secular imagery available in the contemporary manuscripts show that seemingly minute style differences occurred between the clothing of different classes, ranks and occupations of women. That's not to say that a slightly wealthier woman with her foot in the middle class (such as my persona) would not have owned and worn this particular "townswoman" outfit, but rather that it would not have likely been her preferred outfit for social appearances, as it would have conveyed her station to be somewhat lower than her actual affluence allowed.

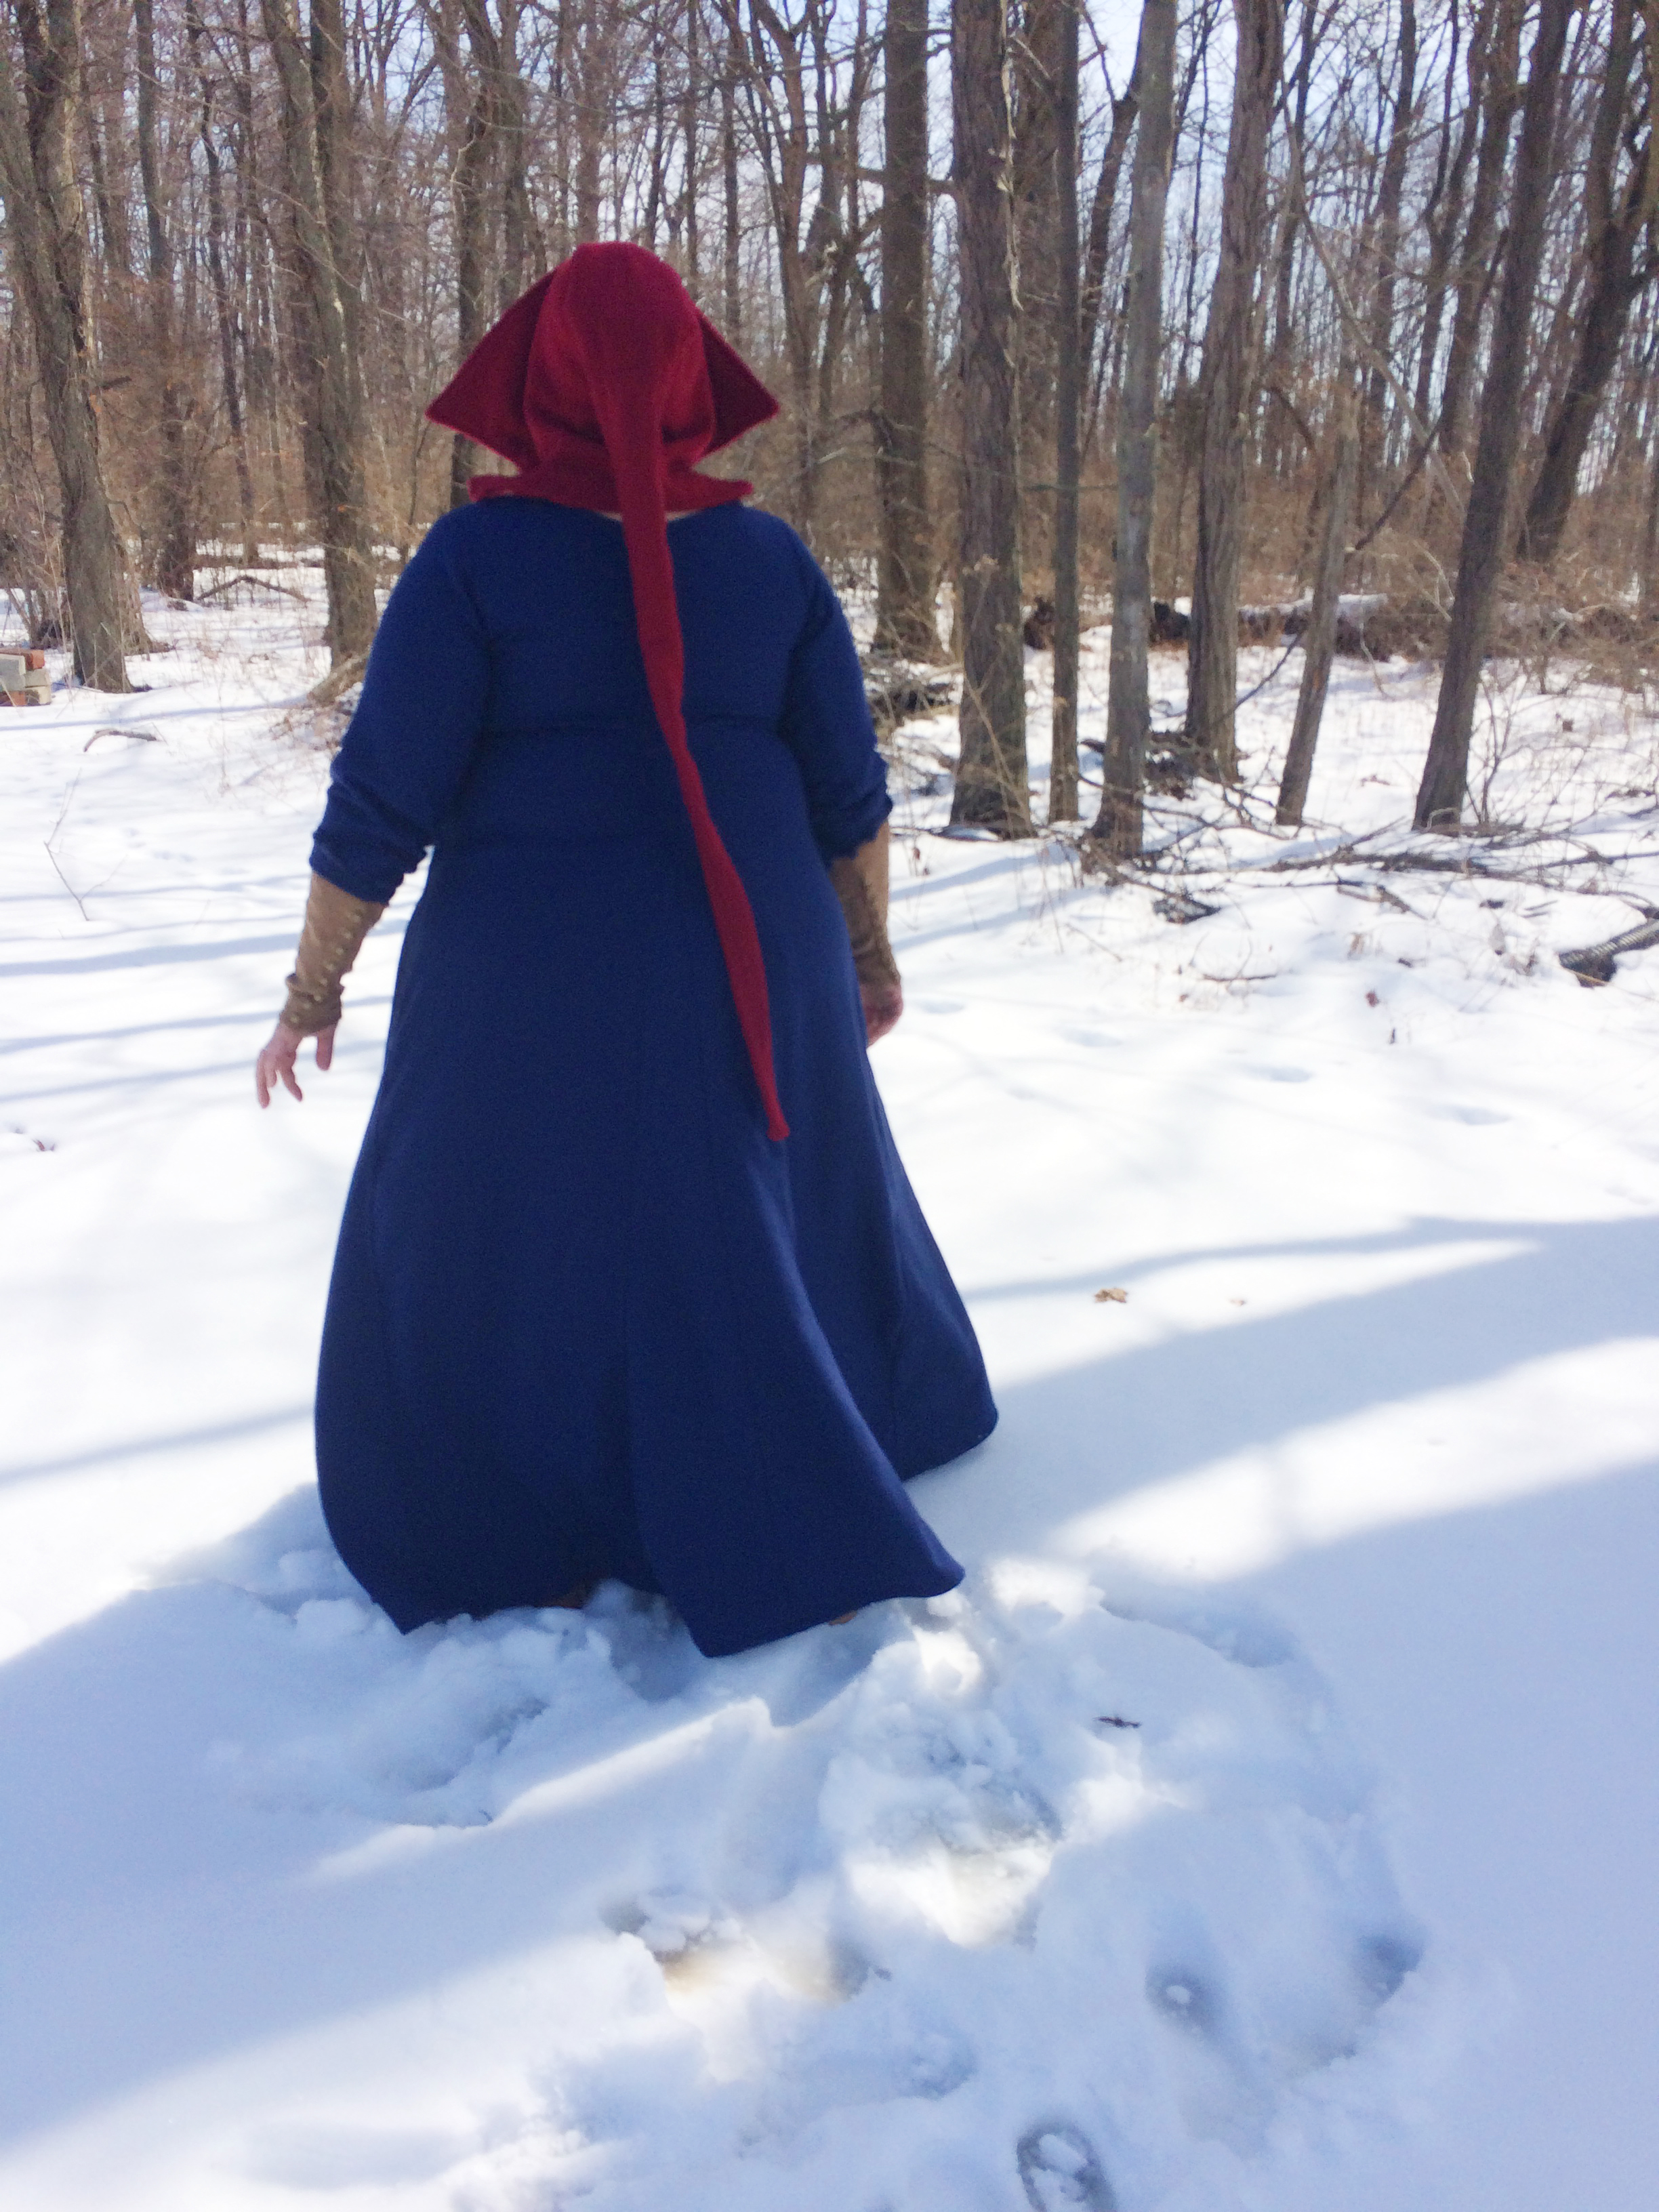
So this outfit, with two long-sleeve fitted dresses worn with an open hood, is in my eye the very specific uniform of a woman engaged in some for of working or laboring activity from the era between 1400 and about 1450. Whether the woman falls into the category of free citizen or indentured servant doesn't make a big difference here- we're looking at a woman who had either an occupation or was required to perform some variety of physical task.


Method
I'm not going to go into too much depth on how I put these together, since I already outlined a bunch. I shared the hood last week. The lower dress is made from a ginger-colored linen. I experimented with a symmetrical pattern for that. The outer dress is made from a navy wool I held on to for way too long. I used the same symmetrical pattern for that. I also used my prototype sleeve drafting method for the wool. I ran into significant difficulty, however, when I discovered that the wool was extremely elastic on the bias. The fault wasn't in my sleeve draft, just in the nature of the wool on the curved armscye. I ended up removing about 3" from the shoulder seams and another 2" from the side seams to account for the stretch. After that, the sleeves fit perfectly.


I used a set of faux-brass buttons (they're actually plastic) for the sleeves on the ginger cote, and stitched the button holes with 100% silk embroidery thread. I literally just happened to have the matching color. I used the buttonhole sewing tutorial at La Cotte Simple, and I'm truly better for it. My previous buttonhole are not even remotely as pretty. The wool dress buttons are fabric using my tutorial, and again, 100% silk thread for the buttonholes.

At the last minute, I decided that I did not want the front lacing on my linen dress. I have several reasons for this (one, admittedly, being that I didn't have a lot of time to do eyelets), but I'm really happy that I made that decision. I have been increasingly frustrated with the performance of lacing on many of my dresses (too much gaping). My bottom-most layer is a laced supportive piece which is doing an excellent job. On top of that, non-laced dresses are really working well for me. I know this isn't supported in the period evidence, or a viable option for most people, but it gets me where I want to go better than any other options I've used.

Not sure what's going on with the color here. It's not really this gray.
The linen dress is entirely handsewn. I had less time for the wool, so the construction seams are machine sewn on that. The finishing on both the linen and wool dress are felled, using overcast (or hem) stitch to tack the seams down. I really prefer the look of that over using running stitch which can snag or break more easily. I hand stitched the skirt hem on the linen as well, but the wool hem is machine sewn (again, a time issue). The necklines on both dresses are finished with a strip of their respective materials and running stitch. The ginger linen neckline is a bit more decorated with three rows, versus the single row on the wool.


Evaluation
Both of these dresses had issues during their construction. On the linen dress, when I decided to skip the lacing, I left the twill tape intact. This was probably not the best move, but so far I'm not irritated with it enough to do anything about it. I also showed the seam finishing on the sleeve seams in two different directions (one going into the sleeve, one going onto the shoulder.) I've decided that I'm just going to consider that an inside joke. With the linen dress, the reality is that the body portion of the dress was never meant to be seen. In the future, I may snap a few photos of it to share with you, but it really isn't anything special or different from what I've shown in the past. I do feel sort of guilty not showing the dress on it's own, but I'm so much more excited about the outfit as a whole, I hope you're willing to forgive me.

The wool dress took an incredible amount of time out of my life. I didn't want to make any more compromises with it than what made sense, so the finishing was a very long process I hadn't really planned for. It was all worth it, though, since the seams look great, and the whole dress is solidly built. As they always say, good things take time.


I didn't line either of these dresses in order to give myself the opportunity to wear them into the spring as long as possible and to have them available to wear earlier in the autumn. If I was favoring authenticity over the practical needs of my personal comfort, I would have lined them both.

Bottom line is that, with everything else ever, there's room for more improvement. But I'm still going to pat myself on the back here. These dresses have taken me further into the realm of accuracy and skill than I've previously gone.

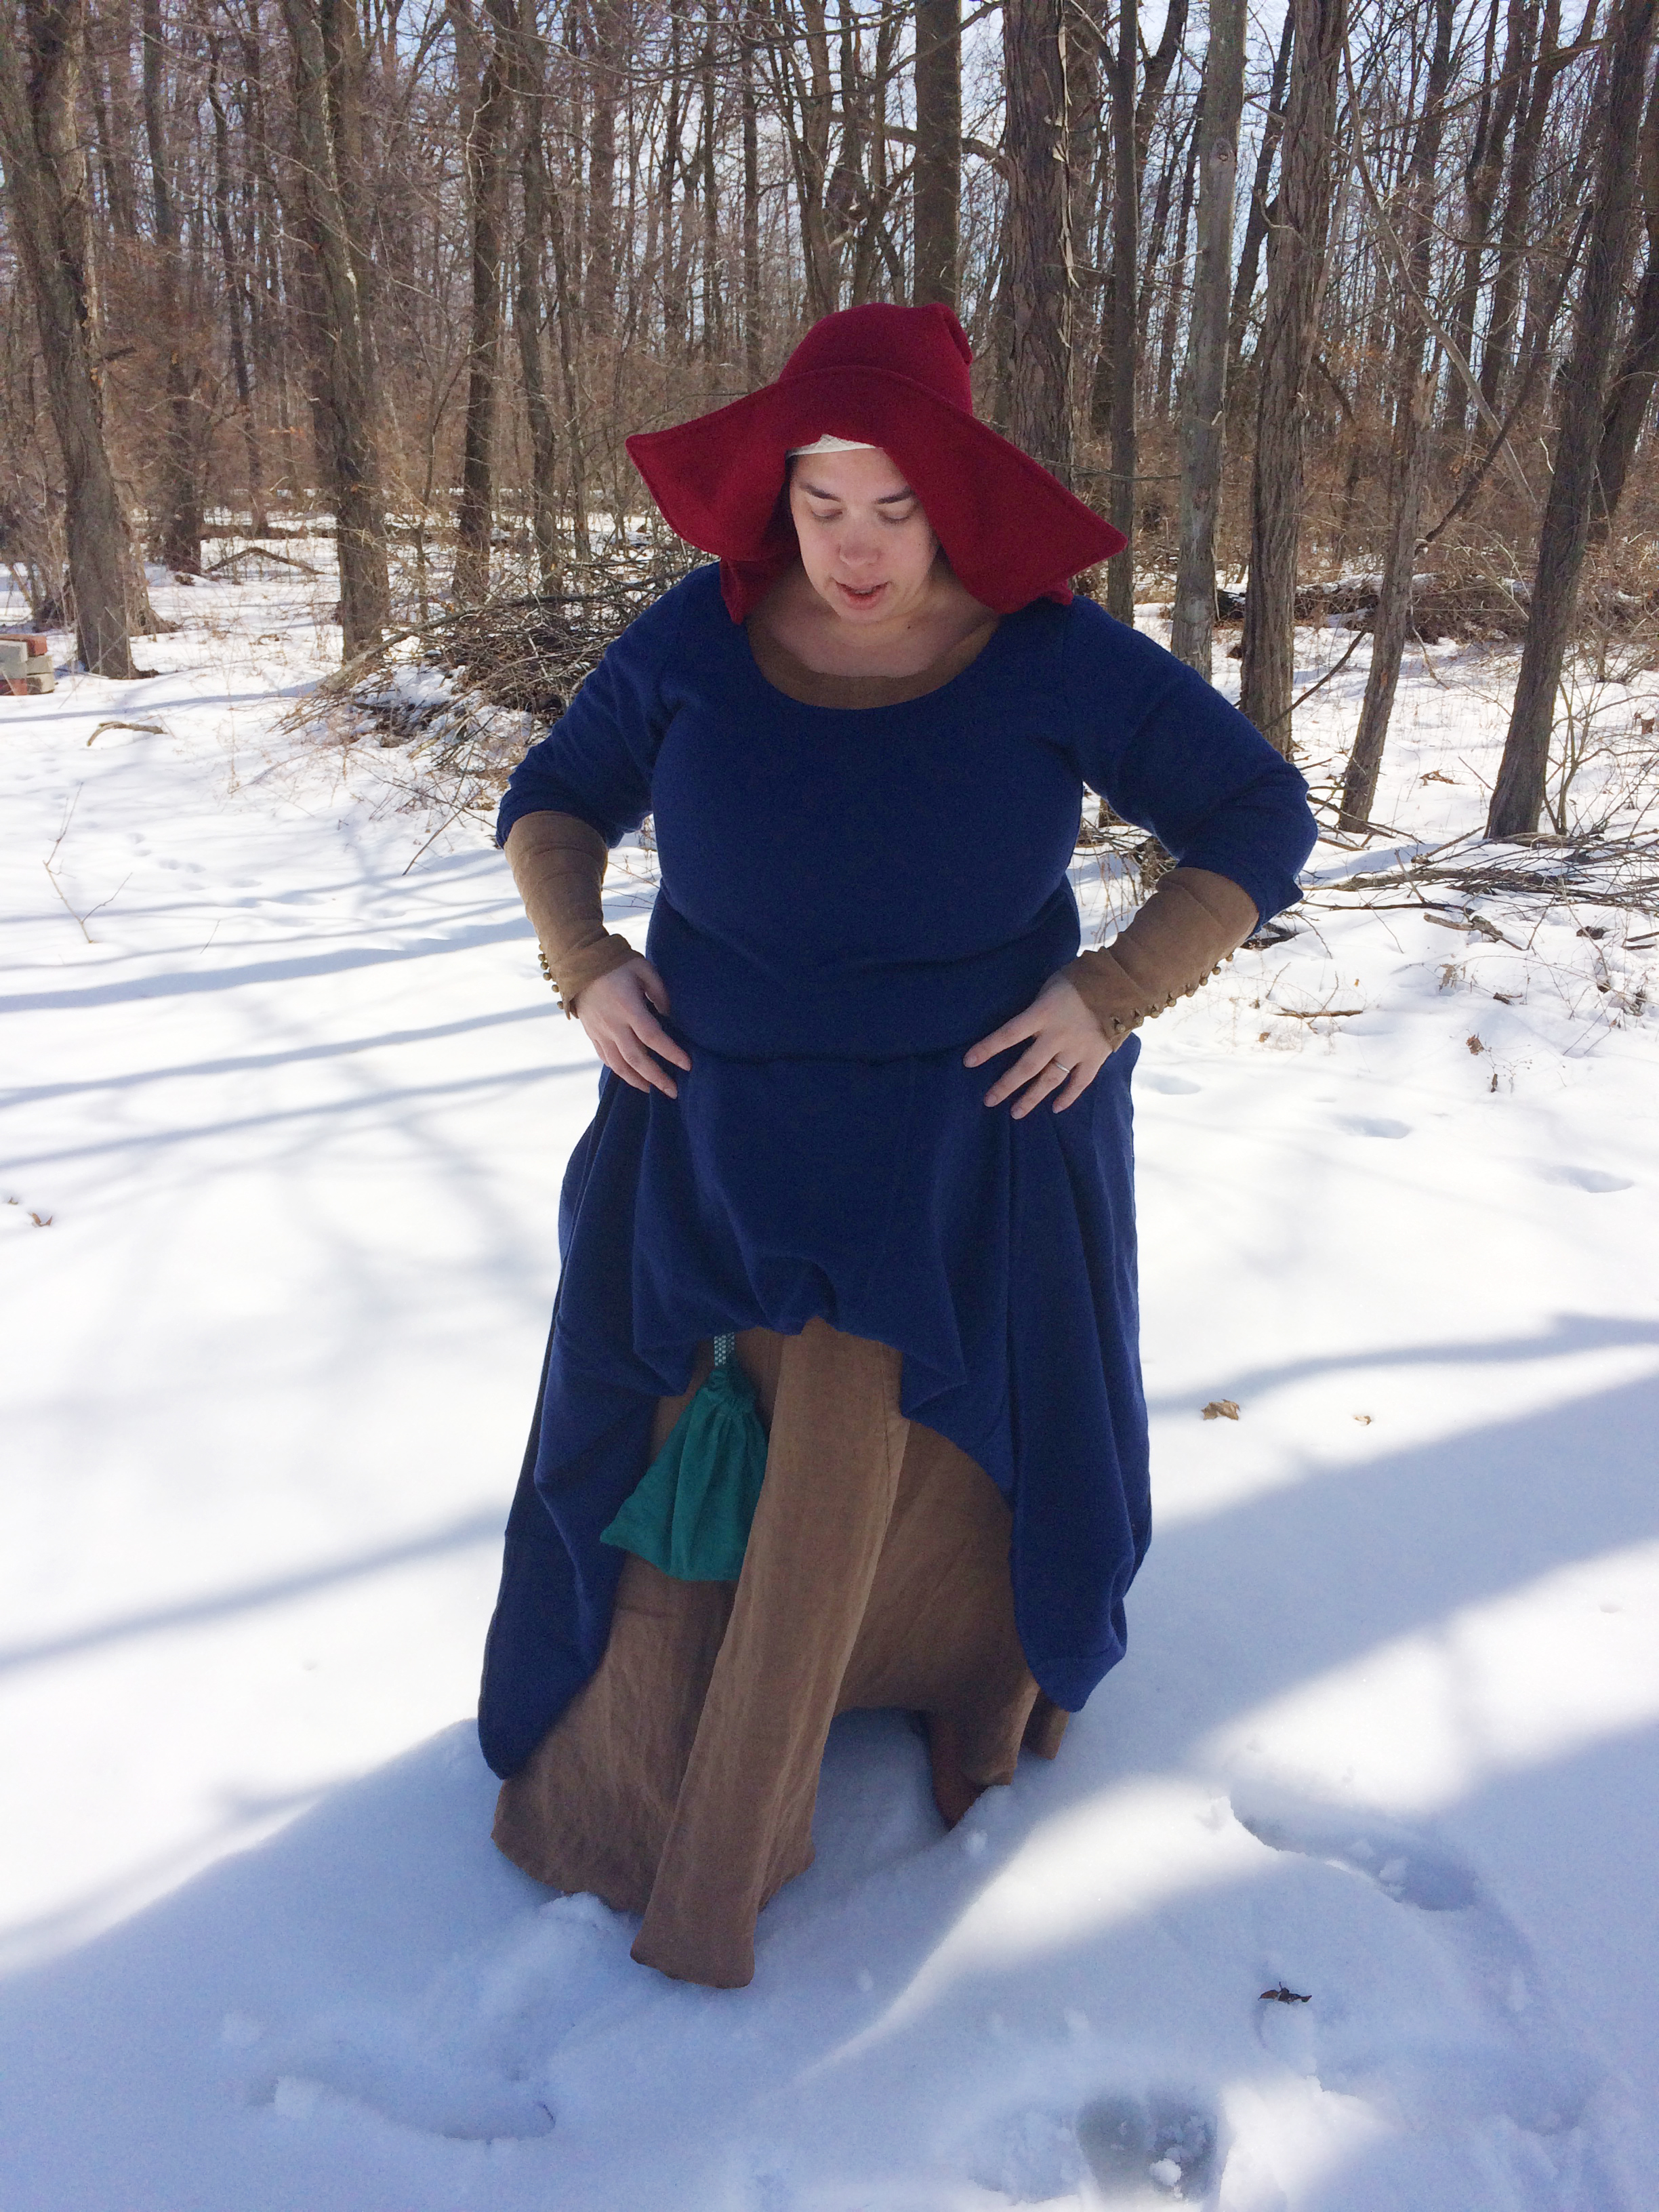
Just look at the wings on the hood!
Conclusion
This project really just proves to me that the more things change, the more they stay the same.


Back at the start of 2011, I developed a complete outfit that was meant to eventually be an A&S entry. I called it my "Garb Quest", and the image above was the original idea I had for what the outfit should be. I stalled out on this project (an unexpected pregnancy derailed me as a start), and eventually realized that the goals of the quest were no longer in alignment with my personal goals. So two years ago, I officially purged it from the project pile.


The thing was, I still had all these materials. And while I still had a ton of research and learning ahead of me, I already had mostly the right idea with my original drawing. So I'm really not surprised that when I put everything on when this outfit was done, it all looked familiar. So I'm going to call it- Garb Quest is DONE.


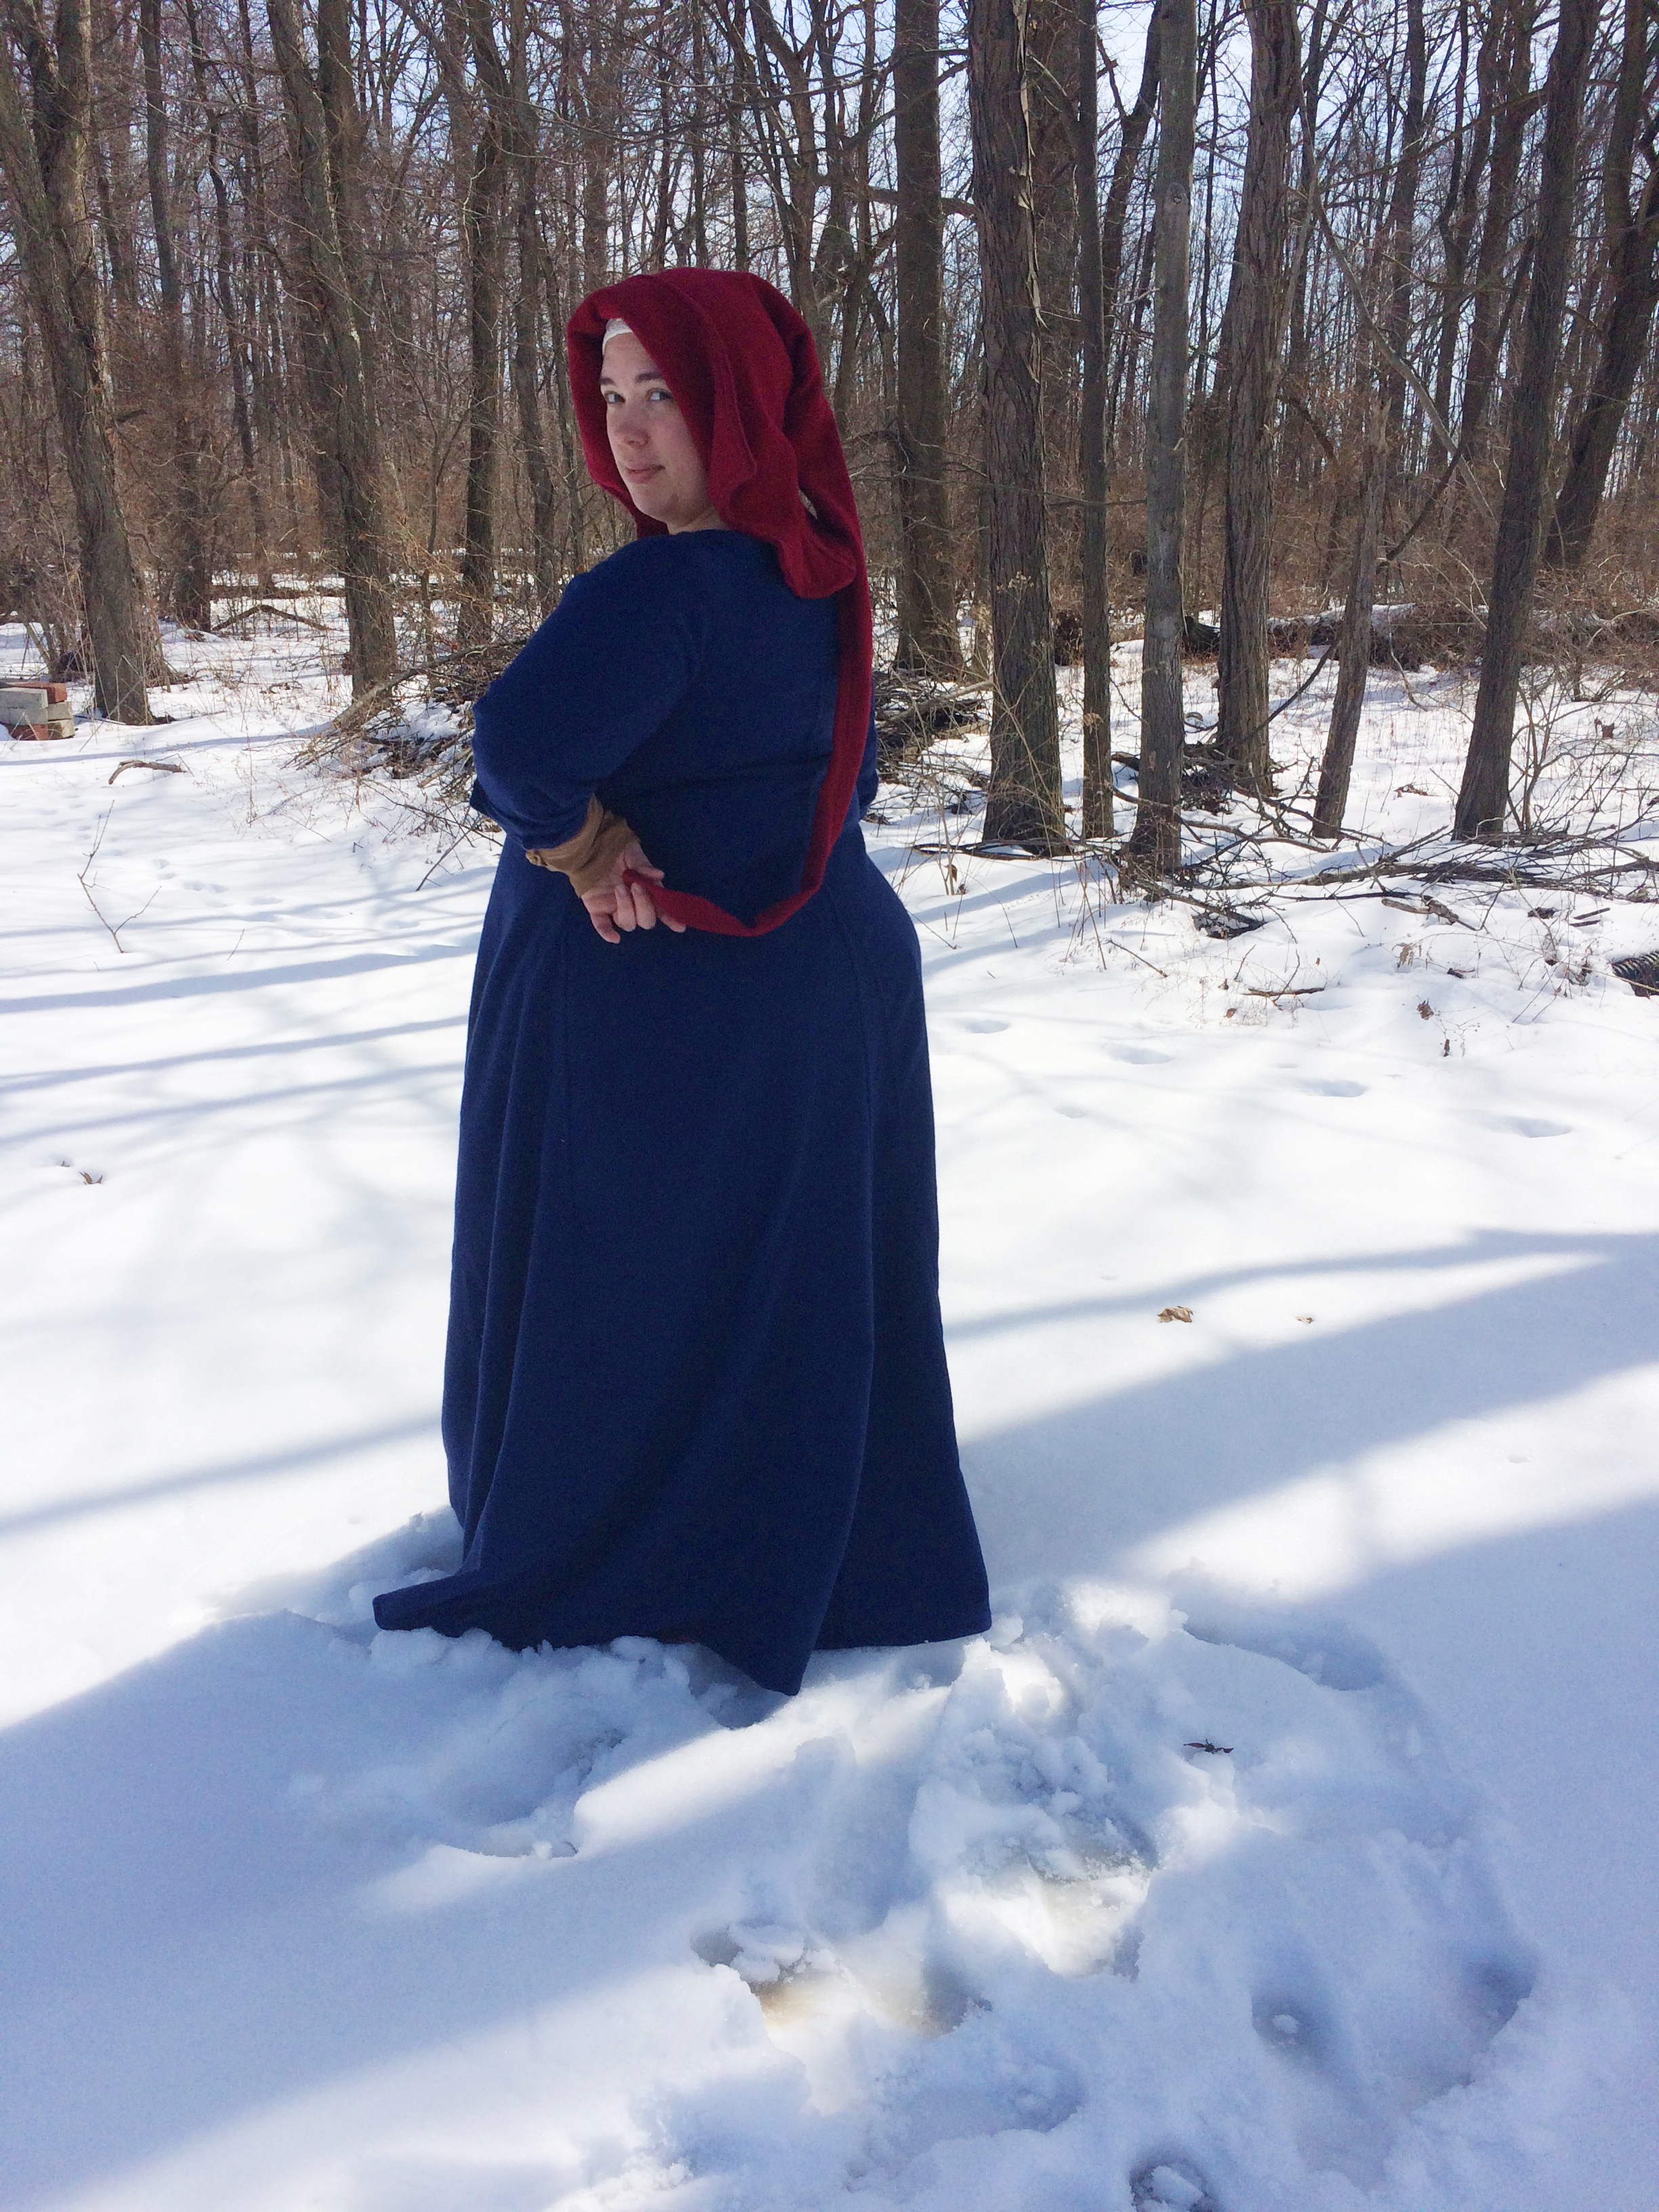
I'm incredibly happy with this outfit, which I'm sure is not news to you. It's comfortable, and despite the single layers pieces, was warm enough when we stepped out into the snow for these photos. The wool is soft and it's a great deep color. I think it will work very well as the middle layer I need for the outfit I'm assembling for the Manuscript Challenge.


 As always, you can see more photos either on Flickr or over at Facebook!

On to the next!

Sunday, March 1, 2015

Project Complete: Red Wool Open Hood

This project has been on my "want" list for a very long time. Like 7 years a long time. I came close with my linen hood, but that one definitely falls flat, both figuratively and literally. But this one? I have a hard time believing that I'll ever need to make another open hood again.


So let me backtrack just a bit by reminding you of this post a few months back. The cliff notes version, in case you haven't read it, is that open hoods are not a style of hat that remained a static constant. The open hood was present for the entire duration of the 15th century, but just like fitted supportive dresses, it evolved as styles and ideals evolved. The open hood of 1410 would have been quite different from the open hood of 1480, even if they were both made from identical pieces of wool.

Ever since that post, I knew that I needed to create a new hood that better matched my findings. While I love my other two hoods, and will continue to wear them, I realized that they were anachronistic when compared to the shapes of hoods worn in the 1400's. They almost didn't match any of the hoods worn at the time. I did find a few examples, but I couldn't take them seriously as "fashionable" in their context.

I started the new hood with a simple goal- get the wings shaped correctly. I was willing to overlook the size and shape of the collar and the width and length of the liripipe because what I'd already come up with was really good, and felt right to me. I didn't want to try changing too many things and end up with a new hood that I hated. So I focused on the brim.


I began by tracing my black hood out on a piece of paper then redrawing the brim. I brought it upward very slightly (and I probably could have gone further upward, but I was being cautious.) Then I jutted the point way out. Around 2" further out than my previous brim. The imagery doesn't indicate that the top would have been that wide, so I eased the line back to my original brim depth at the top.


From that new pattern, I cut out the hood body, the gores, and the liripipe. The hood and gores were cut out at a 4-layer thickness, with the fold at the top. So what you see in the picture is actually two hoods folded in half. I followed my original pattern for the gores and their corresponding slits.


After getting the 4 gores sewn in and the liripipe sewn on to the outside layer, I just tacked all the seam allowances down to keep them flat and to keep the seams looking nice on the right sides. All that sewing was done by hand.


I knew that I needed stability in the brim if I wanted the wings to hold their shape and go where they needed to, so I dug through my stash and found an old piece a felted wool. This particular wool was once part of my very first kirtle, the one that bit the dust when I tried to refit it a few years back.


I married the two layers together, added on the reinforced panel, and used the sewing machine to sew all the way around. I left just the opening of the liripipe unsewn.


Then I clipped the corners and curves. I wanted the cleanest edge I could get, so I was pretty liberal with the clipping.


I turned the body of the hood right-side-out, then stab stitched the entire perimeter. I also finished the edges of the liripipe, which was still a flat piece at this point. The entire thing was still in that manta ray shape, with the back seam unsewn.


To finish the back, I traded the red silk for my heavy duty cotton thread. Since I had four layers of wool to go through, I didn't want to risk breaking the thread simply in the act of sewing. The gray thread is invisible from the outside. I used an overcast stitch down the entire length of the back (right to the tip of the liripipe). And with that the hood was complete.


The brim is thick, which will take some getting used to, but it's incredibly sturdy. It wants to stick out to the side, which is exactly what I want it to do.


I get a great bonnet shape with no effort when I unfold the brim. Since it was snowing when I stepped outside to take these photos, I was really happy with that particular performance.


The liripipe could probably use a bit of ironing.


Let's ignore the slightly crocked cap, shall we?

Overall, I'm incredibly satisfied with the way this hood turned out. I know there's still some adjustments I could have made, but I'm very happy with how much better this new shape meets the shape of hoods from the period between 1415 and 1440. I might look like I'm about to take flight, but I'm okay with that. And I'm really happy to finally cross this one off the list.

Sunday, February 22, 2015

Cast a Smaller Net

Lately, I've been very interested in diving further into the study of late medieval garments not just as what they were and how they were worn, but more specifically how they may have changed during their use and how they were employed with other garments to make appropriate outfits for the wearer. In essence, I've found myself much more sensitive to pairing dresses, gowns, hats, and accessories with each other in a manner consistent with their more specific time and place. I'm no longer interested simply in "15th Century Fashion" as a catch-all category for all the various items in use during that time. Instead, I'm finding much more interest in looking a shorter ranges and narrower geography to eliminate the things that don't fit, and to see what really goes with what.

I think this interest in getting more specific is part of the natural progression toward greater authenticity (that each of us takes at our own pace), but it stems more recently for me from something in particular. I know that our modern culture champions the idea of "mix-and-match". We like to have clothing that can be worn in several situations in different configurations. We're kinda done with one-hit wonders, so we choose versatility. This is a thoroughly modern idea, and it's really only been in the past four decades that the consumer experience centers around the concept of buying individual items to swap around with other individual items. In the past, stores offered up outfits or suits as their primary sell. And before that, women wore dresses- one and done. No need to go crazy with the mixin'.

We're modern women. We're creative in our recreations. Some medieval rules are incredibly easy to overlook or ignore when they appear to be limiting to us. We want all the things, after all. So we apply our present-day ideals of versatile fashion on a society of women that did everything by strict, often unwritten social standards to define themselves in time and place. At a time when a woman's non-conformity to the norms of her community could single her out in the worst kinds of ways, I would say that doing things according to a pattern and sticking with socially acceptable (and approved) fashion identities was a really safe bet. Women found other ways to display their unique characters by applying it to trades or skills, or things such as writing or politics. Women were considered beautiful when they conformed to the ideal (however boring or standard it may seem to us), not when they blazed a trail of wild novelty out on their own.
If we are interested in greater accuracy, we need to stop mixing. We need to quit looking at a single century's fashion as if they were a whole. We need to stop choosing things we like from one end of the timeline and wearing it with something from the other end. And before anyone gets offended, know that I say this to myself as much as anyone else. I've been doing it wrong. Lots of us are.

So today, I challenge each of us to start taking a closer look at our sources and really pay attention to them. Remove the outliers. Find the averages, the standards, the norms. Ignore the extant finds until they fall into the category of "typical". What are the contexts? Who are these women we are looking at? What does she symbolize, and is that something we want to symbolize as well? What appears more often than not? Are two things never seen together in the same outfit? Does one detail belong with another detail? Is something worn the same way, in the same context, every single time it's seen? Focus on less, hone in on specifics. Cast a smaller net for a bit, and see what you learn.

It's a rabbit hole that's worth going down.

Sunday, February 15, 2015

In Progress: Navy Wool Middle Layer

It occurred to me while working on the navy wool dress that it might be a good idea to focus today's post on how I make my dresses these days. I've fallen into some routines and habits that I tend to overlook or gloss over when I share here, since, in my mind at least, it would start to sound like a broken record to outline the steps I take each and every time. I do my best to share when I've done something different (like the symmetrical patterning on the ginger linen dress), but it's those minute steps that I go through that I sort of stopped detailing.

Even before developing the symmetrical pattern on the last dress, I've relied on a standard base pattern to get me started for a while now. So the first step is to determine if I'd like to create a dress with or without a center front seam and to make adjustments to the pattern accordingly. For dresses that will be worn as outer layers (the fashion layers), I prefer to not have a seam. It's a personal visual preference, but it's also what my research has shown to be accurate for early 15th century Franco-Flemish middle class fitted gowns.

Layout is incredibly simplified with the symmetrical pattern, but even with four distinct panels, I prefer to get as much of the material laid out as I can at one time. The best place to do that now is on the living room floor. I use chalk to outline my panels, and a combination of tape measure and yard stick to draw out the remainder of the panels and the gores. (My pattern pieces only go to my hips.) I like to chalk everything out before I cut, just to make sure.

With the symmetrical patterns, I can cut my panels from the folded material.
The left-hand panel is the front, placed on the fold.
I use a sewing gauge, the kind with the little slider, to help me mark out uniform seam allowances all the way around. I don't do that on gores, though- they are what they are when I figure out how large I can make them on the material. I do nothing with the sleeves at this point- the remaining material just gets folded up and put aside until I'm ready for it again.

After getting everything cut out, I start by sewing together any half gores I may have ended up with (usually at least one pair). I sew it and finish it. That way all four gores are full triangles and can all be treated the same way. If I only end up with one gore with a center seam (like I did on the navy dress), I put that in the center back. Not sure why, but I just feel like that makes sense visually.

Before I worry about putting gores in, though, I stitch the panels together and give it a try. If it's an outer gown, I wear it over a dress I intend to wear under it. This gives me a chance to see if I need to make any adjustments to the fit before moving on. I didn't need to make any changes on the navy dress, but I did when I made the ginger linen dress. So far I have always needed to do that on my under dresses. I've spoken before about wearing the dress around the house like that for several hours to allow the linen to stretch before I correct the fitting.

Midway through wearing the ginger dress around the house.
I usually wear leggings and a cardigan to make it a little less weird.
After resewing any necessary adjustments, I then insert the gores. If I'm hand sewing, I hand sew the gores in too. For the navy dress, I'm using the machine for the construction seams, so I used the machine for the gores. When there is no center front seam, the front gore goes into a slit. That can be a bit tricky, and it's taken me a while to get comfortable with how that works and how to do it. I started with this clear tutorial from La Cotte Simple. The principle is the same whether you're hand sewing or machine sewing.

With the gores in, I have the choice to continue on with finishing the seams on the dress body before creating the sleeves, or going right in to the sleeves. From my new drafting method, I have a pattern that I feel really confident with, so all I needed to do was adjust the sleeve holes to match the sleeve head length.

I'd made some marks when I wore it, then used those as guides along with measurements
from the sleeve pattern to find the right curve.
At this point, I've cut the sleeves out and they are waiting to be sewn together. I'll baste them in and try the dress on again to make sure everything's working out right. That will be my last chance to make any adjustments before I move into the finishing blitz.


For the navy dress, I'm using flat felling as the seam du jour. It creates a strong, good-looking seam, and goes pretty fast. I have the option of using running stitch or an overcast or hem stitch to tack it down. I prefer overcast but if I'm short on time, running is the way to go. Since I've got time, I'm using overcast on this dress.

That one in the middle is kind of a runt, isn't it. I'll replace it with one that's the right size.
Just like I do on half gores, I finish the sleeves before sewing them in for real. In this case, I'll be leaving the lower arm open for the last 3" and doing buttons/buttonholes. I've already made the buttons, using my method outlined here. There will be three on each arm. This should be just enough for me to get the sleeves rolled up when I'd like to wear it as a middle class outer layer.

Before I sew the sleeves on, I will finish the shoulder seams and at least the top portion of the side seams. That way I can sew the sleeves into place without having to fuss with getting those seams finished later on. Once the sleeves are in place, I'll finished the rest of the seams.

At the very end of the process, I put the dress on and have someone mark my hem with some chalk. Then it's just hemming and finishing the neckline. I'll share those details when I show you the final dress.

BTW, I also notice in these photos that the blue is all over the place. The buttons are the closest to the real thing.

Sunday, February 1, 2015

A Pinkie Promise

I had planned to share with you my completed Ginger Linen dress today, but just as I was finishing that up, I had a bit of a change to my plans. Plus, it's too cold to be wandering around outside in just a single-layer linen dress to take pictures, and I don't have a suitable interior picture-taking spot at the moment. So even if I was going to share the finished dress with you today, it would have been in bits and pieces, rather than the full photo shoots I normally do. Which would have not been cool, really. I can, however, share this little teaser of the neckline with you:


While I was completing the finishing work on the ginger dress, I decided to pull out the navy blue wool I originally purchased 6 years ago. I had intended it to be used for my now-defunct Garb Quest project, but at the time I still had so much to learn about dressmaking that I feared ruining the piece. I carefully folded it and preserved it as if it was a precious document, and had gotten it into my head that it was the most valuable piece of material I had. Which was a load of bull that I fed myself out of a lack of confidence.

So I pulled that sucker out, ran my hand over it, remembering why I loved it so much (it's so wonderfully soft), and washed it. We hung it up in the shelter in our backyard to dry, but then it rained, then it dropped below freezing, and eventually 2 days later, the wool came back in, only to be draped over our living room furniture to finish drying. If I'd still had any inkling that the wool needed to be preserved, it had been tossed out the window and fed to the possums by that point.

We turned the heat lamp on to prevent the wool from freezing overnight.
To me that was a lesson. Authentic materials (or at least authentic fibers) are costly, and they can tend to feel like investments that must be protected. But the reality is that we purchase these things not just to use them, but to LEARN to use them. Mistakes are always going to be a part of that process. Instead of fearing that a beautiful piece of cloth might be ruined by our ineptitude, we can embrace the opportunity to learn how to deal with any mistakes we may or may not make, and stop allowing them to hold us back. I bought that wool all those years ago to turn it into something. Whether I'd done it then or now, it would still teach me - there's always something new to discover when you're on the path of learning a skill.

So, back to my original point. I got the blue wool ready, and decided that I wanted to try to make a dress with it for the next event I was attending. I was still on the fence about it, though, since there were at least three other projects that needed my attention first. But while I was contemplating this, with the hem of my ginger linen dress still waiting to be completed, a friend started messaging me.

She needed some prompting to help her get back on track with a dress that had been waiting around to be completed for several months. If I had to guess, I'd say that she already knew she needed to get on it, but she needed that other voice to back her up. I was more than happy to oblige. We continued to chat, and then realizing that we would both be attending the event at the end of February, she suggested that we should pinkie promise to both have complete, new outfits for the event.

Now, I'm not sure how pinkie swears work in your circles, but in mine, a pinkie swear is serious business. It's a contract of trust. My husband reminds me when we pinkie swear that a broken pinkie promise means a broken pinkie. And I really like my pinkies. So when I decided to swear on my littlest finger, that's something I don't take lightly.

Since I was very close to completing the ginger linen dress, and the washed wool was waiting to be cut, I sent her my digital pinkie swear, and the deal was struck.

from The Queen's Book (BL Harley 4431), circa 1414, fol. 178
I had already tagged the navy wool to be a component to my Manuscript Challenge outfit, so I needed to figure out how to do it so that it would work has a middle layer. In the challenge outfit, the navy dress is worn under the gray outer gown, as a cote/kirtle. But in order to make the dress for Candlemas, to wear over my ginger linen dress, I need it to function as an outer gown on its own merit. 

Since the ginger linen dress has long sleeves with buttons at the forearms, it makes sense to wear the navy dress sleeves up, to expose the ginger dress. But the navy dress sleeves also need to be able to work down. The solution I have come up with is to make the navy dress sleeves with three buttons at the wrists. The buttons can be undone, and the sleeves loosened enough to roll up to show the dress underneath. The effect will be identical to the rolled-up sleeves spotted in French manuscripts from the first 3rd of the 15th Century, such as this example from The Comedies of Terence:

from The Comedies of Terence (BnF MS Latin 7907 A) circa 1400-1407, fol. 8
This also means that the wool dress won't have any lacing, since it needs to be a fashionable outer layer when worn over other dresses in this rolled-sleeve manner. But that's something I do anyway, since lacing is mostly not a viable option for anything but the lowest supportive layer on me. (Which is what I would wear under the wool dress when wearing it with another outer gown. My supportive short cote is one such bottom-layer option.)

So I'm going to skip sharing the finished Ginger Linen dress with you until I can share the entire new outfit next month. I'm sure you don't mind missing out on photos of me freezing my butt off today if it means you get to see something worth the photo shoot later on.

Sunday, January 25, 2015

Creating a Sleeve Pattern - A Prototype Method


Each month I'm presenting a new tutorial on a medieval skill from various types of textile-related crafts. The purpose is two-fold. First, it will allow me to locate, study, and try a variety of new techniques I might otherwise overlook, and second, it's an easy way to get information out there about skills that other people might be looking for or find helpful. This month, I present Creating a Sleeve Pattern.

If you haven't been playing along, I'd recommend starting with my last post before going through this tutorial.

We left off last week with starting to look at the fundamental concepts of a sleeve that's drafted to fit your bicep properly, and to account for the casual nature of your medieval wear. This week, I'm going to walk you through the method that I created to account for those considerations. This method is a combination of the loose simple method and a stricter, plotted modern sloper method.

I'd like to sincerely thank His Excellency, Master Cellach MacChormach, for patiently walking me through the method of sleeve drafting he's been using, and taking each of my challenges in stride. It was his guidance that helped me step back from my doubts to arrive at the method outlined below.

Before we proceed, I want to make it clear that the method presented below is currently prototypical in nature. I have tested it on three adults for good measure, but we are all different, and you may experience something that completely discounts everything I've worked out. There will always be exceptions that I can't account for. My purpose here is to show you a method that I'm comfortable with, that so far is working for me, and makes sense to my mind. I encourage you to put it to the test and tell me what issues you have with it. That's the only way we can all work together!

As I mentioned in my previous post, small armholes are going to be the rule of the day for this. You'll want the hole as small as you can make it without it pulling as you move or hurting to get it into place (such as if your bicep was too large to comfortably fit through.) I start my armscye at the same size as my bicep, then trim what's in the way. Err on the side of a smaller hole.

I want to acknowledge, one more time, that there are period styles that require a large armscye, but when we're looking at the average cotte or kirtle styles, a small armscye appears to be more typically favored. At least in the imagery. So let's all consider the possibility that larger armholes are the exception, rather than the rule.

Detail from Rogier van der Weyden's Seven Sacraments Altarpiece, showing a small armscye. Note the bunching in the underarm particularly, indicating that the armhole sits in her armpit, rather than below it.
You should wear your assembled garment (or a mockup) with your established armscye in order to take your measurements. Anytime the measurement instructions line up with a section of your armscye, use the approximate position of the sleeve attachment seam as your start/end point. It is extremely important that your measurements correspond to the position of the seam, otherwise you will get fit issues.

I want to stress that this pattern will only work for garments that share the size and positioning of the garment you used to measure. If any of the points of connection from the sleeve to the body are in a different location, something may go askew. So you need to do this process for every unique garment pattern you use. Or, you can create a standard "base" pattern for your garb, along with this sleeve pattern, and simply adjust all the other details of the style as needed, leaving the sleeve and armscye intact as-is.

What we're aiming for here is the equivalent of a "body block" style pattern for our arms. We are creating a pattern that is independent of any style, so as you're making it, think "fitted", rather than "early 14th century sleeves would have...." Once you have the pattern, you've got a basis for whatever stylistic changes you want to make. You'll already have in your pattern the shape of your arm to work around.

You'll need the following measurements:
  • Long Arm Length: from your shoulder to your wrist over your elbow with your arm bent at a 90 degree angle
  • Elbow Length: from your shoulder to your elbow
  • Bicep Length: from your shoulder to the widest point on your upper arm (flex 'em if ya got 'em.)
  • Underarm Length: from your wrist to the base of your armpit with your arm held straight up. The base point is the position of the sleeve attachment seam on the center side seam of your garment.
  • Bicep Width: around your upper arm at the widest point
  • Elbow Width: around your elbow bent at 90 degrees
  • Wrist Width: around your wrist. If you want a sleeve without buttons, you can measure around your hand instead. Some people can fit their hands through their wrist sizing, others can't- gauge for yourself.
  • Armscye Length: around the arm hole of your garment, measured where the seam will be.
  • Fleshy Arm Measurement: Take a look at your arm in the mirror. If you've got plump arms, it's possible that you carry that pretty close to your elbow. If you're lean, you might have a noticeable bulge in the middle that shrinks rapidly well above your elbow. We will account for this particular element of your arm by measuring at least one point on the upper arm between the widest point and the elbow. Your elbow should be bent at 90 degrees for this.
NOTE: We are going to draft without seam allowance. You can add that onto your pattern when you're all done. I find that adding the seam allowances during drafting increases the chance for the sleeve to not fit correctly.

To draw out your pattern, you'll need:
  • A yard stick
  • A t-square, quilting template, or any tool you have to create perpendicular lines
  • Measuring tape
  • At least one color marker or pen. My preference is to have two colors of Sharpie on hand
  • If you have a sleeve curve tool, grab that too. It's not necessary, though.
  • A large piece of paper. I use a roll of newsprint from IKEA. It needs to be wide enough to fit the top of your sleeve, perhaps about 20" minimum.
Start by drawing the Long Arm Length as a straight vertical line in the center of your paper.


Create long, perpendicular, horizontal guidelines at the top and bottom.


On the bottom line, center your Wrist Width plus .5" of ease.


Measure down from the top to your Bicep Length and mark it. Create a perpendicular line here of your Bicep Width plus 1" of ease.


Measure down from the top to your Elbow Length and mark it. Center a perpendicular line here of your Elbow Width plus .5" of ease.


Now measure up from the wrist to the Underarm Length and mark it. Create a perpendicular line here of your Bicep Width plus 1" ease.


You now have the Sleeve Head Depth marked with the line at the very top and the line at your Underarm Length. Do not be surprised if it looks very shallow. If your measurements are less than 1" apart, that may be an indication that the armhole is too low in your armpit. Consider raising it up 1" at the least.


Measure the Sleeve Head Depth to find the center. Draw a horizontal line (parallel to your other width lines) the length of your Bicep Width plus 1" ease, centered. This will be your Curve Axis guideline. You can use a different color for this to keep from getting the lines confused if you need.


Using a tape measure (or flexible ruler or measured piece of string), arrange the Armscye Length on the Curve Axis guideline. The endpoints should also be on the guideline at the ends. The curve should not cross either of the sleeve head boundary lines (top or bottom), but should touch both. That touching connection shouldn't be less than 1" long.. If you can do that only if your endpoints fall shorter than the Bicep Width, consider opening your armhole 1"-2" more.


We're going to make the curve symmetrical, but keep in mind that this may be something you'll want to troubleshoot at a later date, when you're more comfortable with sleeve drafting. This curve isn't arbitrary-every variation to the line changes the fit of the sleeve. This is more than what I can go into here.

If you can't get the curve to fit in the established depth (and don't worry- I would expect that most people can't), add 1/4" to both ends of the axis guide at a time, slide the ends of the tape measure to the new ends of the guide, and readjust the curve until it fits. If you have to go over 1/2" on both sides, continue stretching the width out on only ONE side. This will create an integrated gusset. Note that you might end up with a weird triangly bit once the sleeve is sewn into the tube, and you will need to fiddle with it in the armhole to avoid creating a "pocket" on the back.


If you have a sleeve curve tool, you can use it now to clean up the curve established with your tape measure.

Before moving on, remeasure the whole curve. It needs to match your Armscye Length.

With all this established, we can now begin to form the bicep using the guides we already have in place. First, connect the Curve Axis guideline endpoints to the respective endpoints on the Underarm line.


These triangles form an integrated gore that allows the sleeve to flare out from your bicep to the armscye. If you ended up moving the endpoint out farther than .5" on both sides, they probably look a bit ridiculous. Don't worry, these are just guides to where, mathematically, the seam wants to go. When we correct the line later on for a more organic seam, we'll ease the gore into the bicep.

Connect the Underarm endpoint to the Bicep Width endpoint. (This is going to be a straight line.)


Continue down to the elbow, and finally to the wrist.


Now, I'm not made of boxes, and I'm pretty sure you aren't either. So while these lines get us mostly to the shape we want, it isn't quite right. That's what the Lower Forearm measurement is for.

Take your Fleshy Arm Measurement and add .5" of ease. You'll use that as a width guide. You can measure down from your shoulder to get exact placement, or just eyeball it. You may discover that your line falls really close to the funnel-like guideline. If that's the case, it's up to you if you want to make any adjustments. Even if your measurements fall inside the guides you've already drawn, you should make this forearm adjustment. If it falls more than 1.5" inside, however, you may want to remeasure (or remeasure your bent Elbow Width). We're creating a fitted sleeve, so if it's possible to remove bulk, we should.
Reconnect the lines as needed.


Lastly, smooth out your lines to remove any angles and create a more natural shape. (If you've got another color pen or marker on hand, now's a good time to switch.) Up by the gores, ease the line into the Bicep Width marked at the Bicep Length point, favoring a concave curve.


You now have a sleeve pattern that isn't completely arbitrary, but also didn't require an advanced math degree to create!


Now, I'm leaving the forearm alone. This is something you'll want to adjust on your body when you do a sleeve mockup. Since the bottom of your sleeve pattern is based somewhat on the measurement you took with your arm bent, it's possible that the forearm is too long. Once you've got it on, focus particularly on how the sleeve fits between your straight and bent arm. If there's still a lot of extra fabric below the elbow after you bend your arm, you'll want to take some of that away. In addition, you will probably want to adjust the seam placement if you're adding buttons, but that's a tutorial for a different day.

TESTING

I performed this method on three different arms, mine, my husband's, and my mother's. Here are the three patterns:

From left to right: my mom's, my husband's, and mine.
I discovered on my mothers that she required a larger armscye than we originally thought due to the nature of the connection between her arm and back. While I was able to stick with something closer to 3.5" larger than my bicep for my pattern, she has to go closer to 4.75". My husband's armscye sits squarely at 6.5" larger than his bicep. So while I had hoped to see some standardization here, it looks like individual physiology is the real determining factor. If I did another pattern for my mom, I think I would start the flaring for the gores a little lower than her Bicep Length line to account for her physical shape. As it is, though, the first draft pattern works, even if there's room for some finessing.

We also found that my mother's secondary upper arm measurement was smaller than her bent elbow. We adjusted the pattern, so you can see there's a bit of a jog from her bicep to the elbow. In the fitting, she didn't feel that, and visually, it wasn't noticeable. In fact, she had a very nicely fitted elbow pocket, and I wonder if that was in part because of that adjustment.

The length was very good on mine and my mother's- just a little too long. On my husband's, however, the fit below the elbow was pretty large and longer. If I had to take a guess as to the specific reason that happened (again, already knowing that it may be too long due to the nature of the measuring), I would say it was because he was subconsciously flexing his bent arm since it was under scrutiny. He did say, however, that the fit was comfortable, and I'd venture to guess that he would actually hate to have it too much tighter.

I've wanted to add sleeves to my linen short cote (which I've never shown because it's hideous, but it's a supportive cote in a single linen layer), so I sewed my sleeve mockup into that to test the fit. I would call it a success. Note that I did not adjust the pattern at all- this is the mockup produced directly from my pattern draft.


At first, I was worried that the bicep was too loose, but as I moved, I saw that it was a great fit, conforming to my upper arm shape very well regardless of the position I held it. I experienced no uncomfortable pulling or bunching as I moved, and I had no limitations. I see in these photos the same type of bunching shown in the period image at the top, and while I know that's indicative in the modern world of the armscye being a bit too small in my armpit, I'm jazzed to see that I can recreate the look as I expect to.

What I'm most excited to see so far with this method is that establishing the boundaries of the sleeve head depth makes it actually easier to see the need for the flaring gores. I was interested in particular to see the radical difference between the nearly non-existent gores on the smaller bicep-to-armscye ratio as compared to the larger one on my husband's sleeve. These were all created within the perimeters of the method, and additionally, can just as easily be adjusted without breaking the rules should a larger or smaller armscye be needed.

If you give this method a try, please comment below and let me know how it worked for you. Is there an issue that came up for you that I didn't account for? Did it work perfectly? Please let me know so I can make these instructions better! 

[Addendum 2/15/2015: It is crucially important that your armhole fits before you proceed. That might mean that the hole is several inches larger than your bicep. While you want it to be small, there is such a thing as too small. Look for areas where it pulls and pools as you move your arm around. The biggest culprits are going to be the front (where you would put a dart if you were creating a modern garment) and the armpit. I also want to point out again that a pattern created with this method will only work for armholes that match the one you patterned it for. When it doubt, re-pattern just to be sure.)

Sunday, January 18, 2015

Sleeves Aren't Evil

Over the past 2 months, I've given sleeve patterning an inordinate amount of thought. I've swung between the extremes on both ends- first believing that it's okay to just wing it with an old pattern I had on hand, then believing that every inch of the pattern had to be carefully plotted and accounted for. I had, in actuality, gotten too close to the problem.

"Sleeves are the worst," is a self-fulfilling prophecy. I'd convinced myself that sleeves were evil because I'd recognized that they were difficult. I knew they were difficult before I even started sewing my own garb. The sleeves on my early cotehardies never fit right, so when I made my first dress, I already had it in my mind that the sleeves would suck. And they did. Self-fulfilling prophecy.

Sleeves aren't the devil, but I'm not going to lie- they aren't easy. There's a middle road between winging them and strictly plotting them out, but once you find it, sleeves make so much more sense. I'm happy to report that I have found it, and I'd like to help you get here too.

I mentioned that I'd gotten too close to the problem. I was so convinced that perfect sleeves were impossible that I doubted every method presented to me. Which meant a lot of questions starting with, "But why...?" I can see now that those questions weren't in vain, since they helped me see that middle road, but  I got so caught up in questioning every method, I started discounting things I shouldn't have.

If you read my last post, you may have noticed my disrespect for what I called the "magical method" of sleeve drafting. The reality is that the typical way this method is presented is open for errors. In some ways, it over-simplifies the drafting process to the point that it ignores some key considerations. The two major ones are the resulting width given for the bicep, and the length of the sleeve in the underarm. (These two things, by the way, are actually connected in the drafting method.)

In most modern sleeve drafting techniques (which I refer to as the "sloper method"), your pattern is created by using all the same measurements that the magical method uses, PLUS the an additional measurement that is either the "underarm" (length from wrist to armpit) or "arm depth" (length from shoulder to armpit). These are a 6 of one, half-dozen of the other set- together they account for the entire length of your arm with your armpit as the mid-point. I prefer the underarm measurement, since it's the easier of the two to measure.

In the sloper method, the length of your arm (top of the shoulder to the wrist) and the underarm measurement are lined up together at the wrist. The difference between them is known as the sleeve head, and is the area in which the sleeve's S-curve occurs.

In the magical method (which I really should start calling the "simple method" instead), there is no distinguished sleeve head area- there's no markers for boundaries. It was noticing this lack of delineation that first got me doubting that the method was any good. "It's too arbitrary!" I claimed. And given that I'd come to understand that sleeves are, indeed, science (see my last post), I wasn't willing to accept that anything in the method could be arbitrary and still be good.

Now, before I go any further, I feel I need to stare that I still believe everything I said in my last post. I still believe that the only way to get the absolute perfect, best fitting sleeve you can is to tweak it based in the issues you are seeing. I still believe that there is no way you will ever get a sleeve "right" on the very first try, regardless of the method you use. But since writing that, I also now understand that "good enough" is an acceptable alternative, as long as it genuinely is good, and not what you're settling for out of laziness or because sleeves totally confound you and you can't take the time to troubleshoot. I'd define the "good enough" line based on how the sleeves feel. They shouldn't hurt you, as a start.

So back to those two problem areas in the simple method- underarm length and bicep width.

Following your typical simple method, at one point you end up with something that looks like this:


Your arm length makes up your vertical guide. Then your wrist measurement and your bicep measurement make up the top and bottom lines (all centered). You will probably also have an elbow width marked halfway or so down. Finally, your armhole (armscye) measurement from your garment provides the length of the sleeve head curve, arranged as an S to account for the finished circle shape.

Since you've got no guidelines for that curve, the instinct is to place it just under your bicep line, and to match up your end points to the bicep width. Then the length of the curve is arranged in a symmetrically (same length of curve on either side of the center line).

Just at this point, there's already two potential problems. First, there's a high likelihood your sleeve head is the wrong depth (either too tall or, less likely, too short). Second, you've just removed a portion of your bicep width.

Your bicep isn't a funnel. It doesn't start out at it's greatest width right at the top, then taper evenly to your elbow width. Most people, muscular or flabby, have a wider bicep measurement anywhere between 3" to 7" down from their shoulder than they do right at the top. In fact, when you measured your bicep, that widest point is probably where you placed the tape measure. For me, it's about 5" down. It certainly wasn't right against my armpit. So when you use your bicep measurement in this simplified method, note that you've just claimed that width at the top of the sleeve.

When you connect the dots, from the bicep to the elbow, you're not creating a rounded, elongated tube that resembles your upper arm. You're creating a funnel.

If you've been over-compensating your measurements by adding 2" or more of ease, you're probably lucky here. That additional width will probably save this funnel from being too small. But just because you got lucky doesn't mean you got it right. You may find that your sleeve is too loose for the style you were aiming for, or perhaps there are issues in other ways the sleeve fits (what happens when you raise your arm over your head?) Don't be tempted to take those issues for granted, simply because the sleeve "fits". Ask yourself if it really is good enough?

If you weren't lucky, you'll know it- the bicep will be too tight. Either your arm won't fit, or you'll get pulling across the bicep when you start moving your arm around. This is the problem I always had from this method. My aim is always a tight sleeve in keeping with the 15th century dress styles I do. So I tend to add little to no ease. (This is also a mistake, as I've learned.)

So the simple method may prove to be a little too simple. (What's that saying- it's too good to be true?) But what if we can make up for those issues lacking direction in the simple method by adding in some of the directions found in the sloper method? What if we can tame the arbitrary nature of the simple method, even if we can't eliminate it?

At which point we end up back at the underarm measurement. If we can establish the boundaries of the sleeve head first, then mark the bicep width below that (rather than within it, which is what's currently happening), we're setting the correct stage. Then from there, we can tackle the sleeve head curve and the bicep length, before moving on the elbow and forearm.

I want to take a side trip to the armscye, and talk briefly about the dynamics of the sleeve head curve. To see a great illustration of how the two are related, I recommend checking out ikatbag.com, and reviewing the tissue box demonstration halfway down the post. In short, the angle at which a sleeve is set into an armscye directly effects both the fit of that sleeve and the shape of the sleeve head. The most important take-away from this, for our purposes today, is to take note that a casual, but not loose sleeve should be the aim for us in creating medieval garments- we're not making formal uniforms but rather everyday wear. We'll also want to note, as stated in Mathilde Bourrette's sleeve documentation that a shallow sleeve head curve allows more/better ease of movement.

Taken together, this tells us that the armscye measurement should not be greatly larger than the bicep. (There are major, period exceptions to this, including the grande assiette sleeve, but we're talking about basic sleeves here.) When you're creating your armscye, therefore, it's best to keep it as small as you can up to the point you create and insert your sleeves. This will give you a leg up (or is that 'arm up'?) on achieving a good, comfortable curve. I try to keep it close to my bicep measurement, but that might be too small for you.

I'm going to end this post here, and leave you all in suspense. I worked through an entire drafting method this afternoon, but I'm not happy with the photos I took and I need time to develop better visuals. So I'm going to leave that for next week and 2015's first Medieval Crafting Skill of the Month. I hope I've piqued your interest, though, because I really believe that the method I've arrived as is worth a look.